SQLDelight in Kotlin Multiplatform (KMP)

One essential aspect of many applications is persistent data storage and SQLDelight is a popular library for managing database interactions in Kotlin projects.
In this blog post, we’ll walk through the process of integrating SQLDelight into a KMP project, enabling you to efficiently manage your database interactions across various platforms (Android, iOS, Desktop).
What is SQLDelight?
SQLDelight is a Kotlin library that generates typesafe Kotlin APIs from your SQL statements, enabling you to write database queries in SQL and access them through generated Kotlin code.
This approach provides compile-time safety and ensures that your database interactions are efficient and error-free.
Prerequisites
Before we begin, make sure you have the following:
- Kotlin Multiplatform project set up.
- Basic understanding of SQL.
- (Optional) Install the SQLDelight IDE plugin
Step1: Add SQLDelight to your project
First and foremost, add the verion in your libs.versions.toml script.
1
2
3
4
5
6
7
8
9
10
11
[versions]
sqldelight = "2.0.1"

[libraries]
sqldelight-android = { module = "app.cash.sqldelight:android-driver", version.ref = "sqldelight" }
sqldelight-ios = { module = "app.cash.sqldelight:native-driver", version.ref = "sqldelight" }
sqldelight-desktop = { module = "app.cash.sqldelight:sqlite-driver", version.ref = "sqldelight" }
sqldelight-coroutines = { module = "app.cash.sqldelight:coroutines-extensions", version.ref = "sqldelight" }

[plugins]
sqldelight = { id = "app.cash.sqldelight", version.ref = "sqldelight" }
Open your project’s build.gradle.kts and add the plugin
1
2
3
4
plugins {
    ....
    alias(libs.plugins.sqldelight) apply false
}
Then in your :shared module or wherever you’d host your database, apply the plugin.
1
2
3
4
plugins {
    ....
    alias(libs.plugins.sqldelight)
}
In the same module’s build.gradle.kts you can configure the package name where the database will be created and as well as the database’s name.
1
2
3
4
5
6
7
sqldelight {
    databases {
        create("Database") {
            packageName = "dev.funkymuse.myapp.shared.database"
        }
    }
}
and add the driver’s platform specific implementations
1
2
3
4
5
6
7
8
9
10
11
12
13
14
15
16
17
18
19
20
21
22
23
24
25
26
27
 sourceSets {
        commonMain {
            dependencies {
                ....
                implementation(libs.sqldelight.coroutines)
            }
        }

        androidMain {
            dependencies {
                ....
                implementation(libs.sqldelight.android)
            }
        }
        jvmMain { //or desktop main
            dependencies {
                ....
                implementation(libs.sqldelight.desktop)
            }
        }
        iosMain {
            dependencies {
                ....
                implementation(libs.sqldelight.ios)
            }
        }
    }
Step 2: Define Your Database Schema
Create a .sq file where you define your database schema using SQL.
For example, let’s create a favorite_movies.sq file, that file should be located in the root folder of your module, i.e if you are creating your database in commonMain of your :shared module, the folder structure should be shared\src\commonMain\sqldelight\dev.funkymuse.myapp.shared.database where you append your package name.
It should look like this 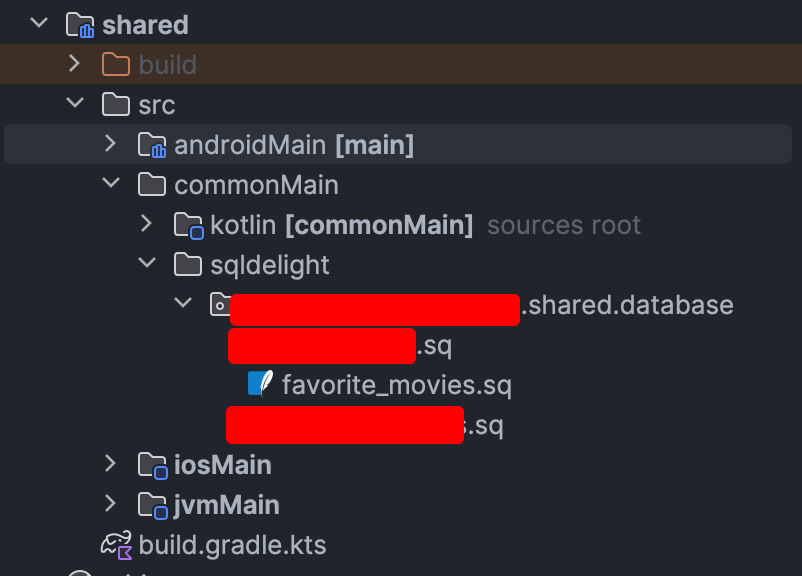
The .sq file contains the following:
1
2
3
4
5
6
7
8
9
10
11
12
13
14
15
16
17
18
19
20
21
22
23
24
25
26
27
28
29
30
31
32
33
34
35
36
37
38
39
40
41
42
43
---TABLE
CREATE TABLE IF NOT EXISTS `favorite_movies`(
    `id` INTEGER PRIMARY KEY NOT NULL,
    `rating` REAL,
    `title` TEXT NOT NULL,
    `year` INTEGER,
    `poster` TEXT
);

---INDICES
CREATE UNIQUE INDEX IF NOT EXISTS favorite_movies_id_title_idxs ON `favorite_movies` (`id`,`title`);


--QUERIES
entries:
SELECT * FROM `favorite_movies` ORDER BY year DESC;

getById:
SELECT * FROM `favorite_movies` WHERE id = :id LIMIT 1;

deleteWithIds:
DELETE FROM `favorite_movies` WHERE id IN ?;

deleteWithId:
DELETE FROM `favorite_movies` WHERE id = :id;

deleteAll:
DELETE FROM `favorite_movies`;

insert:
INSERT OR REPLACE INTO `favorite_movies` (
    `id`,
    `rating`,
    `title`,
    `year`,
    `poster`
) VALUES (
    :id,
    :rating,
    :title,
    :year,
    :poster
);
Step 3: Create platform specific SQL driver
Expect classes are in beta as for writing this article, you can enable them by:
1
2
3
4
5
6
7
8
9
kotlin {
    targets.configureEach {
        compilations.configureEach {
            compilerOptions.configure {
                freeCompilerArgs.add("-Xexpect-actual-classes")
            }
        }
    }
}
Inside your :commonMain create a DatabaseDriver.kt
1
2
3
4
expect class DatabaseDriver {
    fun createDriver(): SqlDriver
}
const val DB_NAME = "test.db"
Inside :androidMain create a DatabaseDriver.android.kt
#1. You can do it either by injecting the context as a constructor, more info here.
1
2
3
4
5
6
7
actual class DatabaseDriver(private val context: Context) {
    actual fun createDriver(): SqlDriver = AndroidSqliteDriver(
        schema = Database.Schema,
        context = context,
        name = DB_NAME
    )
}
#2. You can read my previous article where I share an already known trick, which is my preferred way of doing this, let’s keep it this way.
1
2
3
actual class DatabaseDriver {
    actual fun createDriver(): SqlDriver  = AndroidSqliteDriver(Database.Schema, applicationContext, DB_NAME)
}
Inside :iosMain create a DatabaseDriver.ios.kt
1
2
3
4
5
6
actual class DatabaseDriver {
    actual fun createDriver(): SqlDriver = NativeSqliteDriver(
        schema = Database.Schema,
        name = DB_NAME
    )
}
Inside your project.pbxproj add -lsqlite3 otherwise you’ll get undenfied symbols error
1
2
3
4
5
6
OTHER_LDFLAGS = (
					"$(inherited)",
					"-framework",
					composeApp,
					"-lsqlite3",
				);
or via XCode add -lsqlite3 to Other Liker Flags in your Bulid Settings just as show in the picture.
 Thanks to kpgalligan’s comment
Inside :jvmMain/:desktopMain create a DatabaseDriver.jvm.kt
1
2
3
4
5
6
7
8
9
10
11
12
13
14
15
16
17
18
19
20
21
22
actual class DatabaseDriver {
    actual fun createDriver(): SqlDriver {
        val isDebug = true// or you can use BuildKonfig.isDebug to setup your logic
        val parentFolder = if (isDebug) {
            File(System.getProperty("java.io.tmpdir"))
        } else {
            File(System.getProperty("user.home") + "/MyFancyApp")
        }
        if (!parentFolder.exists()) {
            parentFolder.mkdirs()
        }
        val databasePath = if (isDebug) {
            File(System.getProperty("java.io.tmpdir"), DB_NAME)
        } else {
            File(parentFolder, DB_NAME)
        }
        return JdbcSqliteDriver(url = "jdbc:sqlite:${databasePath.absolutePath}").also { driver ->
            Database.Schema.create(driver = driver)
        }
    }

}
The reason we’re passing the file to the driver is that we want to store the database somewhere. In this example, it’s shown that in release mode, it would be placed in the user’s home folder under the app’s name as a subfolder. Otherwise, ‘debug’ mode puts it in the java temp dir which is useful for short-term debugging.
You can also use JdbcSqliteDriver.IN_MEMORY but for the sake of persistence, let’s keep it this way.
Keep in mind that obtaining/creating the file of the database is an I/O operation and should be offloaded to an I/O thread. This is just an example and not directly copy-pasteable code.
Step 3: Use your typesafe Database
You can force create the database interface by running
1
./gradlew :shared:generateCommonMainDatabaseInterface
Now, we have a database which we can instantiate, by doing val database = Database(DatabaseDriver().createDriver()), you can read my previous article where to initialize it.
Every .sq file gets it’s own class that you can use to query the database, in this example we can access it via database.favorite_moviesQueries
Let’s create a helper model for our database query.
1
2
3
4
5
6
7
data class FavoriteModel(
    val id: Long,
    val title: String,
    val rating: Double?,
    val poster: String?,
    val year : Long
)
A data source
1
2
3
4
5
6
7
8
9
10
11
12
interface FavoriteMoviesLocalDataSource {
    val favoriteMovies : Flow<List<FavoriteModel>>
    suspend fun deleteFavoriteMovies(ids: List<Long>)
    suspend fun deleteWithId(id: Long)
    suspend fun insert(
        id: Long,
        rating: Double?,
        title: String,
        year: Long?,
        poster: String?
    )
}
and implement it
1
2
3
4
5
6
7
8
9
10
11
12
13
14
15
16
17
18
19
20
21
22
23
24
25
26
27
28
29
30
31
32
33
34
35
36
37
38
39
40
41
internal class FavoriteMoviesLocalDataSourceImpl internal constructor(
    private val favoriteMoviesQueries: Favorite_moviesQueries,
    private val ioDispatcher: CoroutineDispatcher = Dispatchers.IO
) : FavoriteMoviesLocalDataSource {

    override val favoriteMovies: Flow<List<FavoriteModel>> =
        favoriteMoviesQueries.entries(mapper = { id, rating, title, year, poster ->
            FavoriteModel(
                id = id,
                title = title,
                poster = poster,
                rating = rating,
                year = year
            )
        }).asFlow()
            .mapToList(ioDispatcher)

    override suspend fun deleteFavoriteMovies(ids: List<Long>) = withContext(ioDispatcher) {
        favoriteMoviesQueries.deleteWithIds(ids)
    }

    override suspend fun deleteWithId(id: Long) = withContext(ioDispatcher) {
        favoriteMoviesQueries.deleteWithId(id)
    }

    override suspend fun insert(
        id: Long,
        rating: Double?,
        title: String,
        year: Long?,
        poster: String?,
    ) = withContext(ioDispatcher) {
        favoriteMoviesQueries.insert(
            id = id,
            rating = rating,
            title = title,
            poster = poster,
            year = year
        )
    }
}
Conclusion
Integrating SQLDelight into your Kotlin Multiplatform project allows you to manage database interactions efficiently across different platforms.
By leveraging the power of SQL and Kotlin, you can ensure type safety and reliability in your database operations.
Room doesn’t have KMP support yet, but they’re on their way. I’m excited to see what they’ll bring to the table too.
I miss batch insert support for SQLDelight out of the box which forces you to kinda use queries.transaction { } and splitting the original list.
Since doing backend work, I’ve found SQLDelight to be a more natural way of expressing everything in a pure SQL manner, where Room does more for you with the help of KSP.
Until next article.